Showing posts with label grip. Show all posts
Showing posts with label grip. Show all posts
Wednesday, 14 January 2015


Tuesday, 10 September 2013
The Grip
Carving the grip is the most personal job in paddle making. Part of the reason I got into this hobby is that I felt most commercial grips were uncomfortable for my broad palms. After a few km of paddling, I'd get sore where they would bite into my hands. I also find the standard "pear" grip to be aesthetically bland and have always been curious as to the artistic & functional grips carved by First Nation natives.
 For inspiration, I've used Adney's work, Bark Canoes and Skin Boats of North America which has some fantastic sketches of various styles, like the 3 Passamaquoddy styles in the image. Typically these elongated grips allowed for a more natural grip posture so that less correction and wrist strain is produced while paddling...a definite plus while paddling solo.
Doug Ingram's site, has a great section on various grip styles that he's produced over the years.
One of my favourites is also the also the simplest to make...the elongated Maliseet grip...basically an elongated (up to 12 inches) flattened rectangle that's cambered to fit nicely in your palm when placed along the side. These grips can also be grasped along the top and don't need any rasp work or other carving instruments to shape other than the basic spokeshave. It's basically like carving another smaller, thicker blade. For decoration, I used a round file to shape out 2 semicircles along the bottom edge of the grip.

Maliseet grip in the cut out blank...basically an elongated rectangle

Cambering the grip with a spokshave

Completed Maliseet grip
Friday, 9 August 2013
Fixing an old failure scarfing a grip onto a sassafras northwoods Part 2
When working on the old busted sassafras tripper, a scarf repair was attempted on the shaft so that the paddle could be salvaged into a user again.

A joint was cut and a sassafras cutoff was successfully glued up.

A new centre line was drawn on the upper portion and a squarish grip similar to a design at the Maine Hudson Museum was sketched out. After cutting out the profile, the grip was worked on vigorously with a crooked knife and rasp to get the desired "grip bumps" and angled edges.

The new grip
The blade had weathered after being exposed untreated to the elements for years. It had been positioned upside down in the garden along the east fence line. The back of the blade facing the yard hard had weathered to a light brown colour while the more exposed face weathered into a greyish black patina.


Different sides of the weathered blade
After the successful glue repair, the shoulder and shaft area of the original blade revealed that the underlying sassafras has turned its golden brown. Between the blade weathering, the darkened sassafras and the light creamy new sassafras grip, the paddle now has 3 distinct colour tones. Not sure at this stage if I'll leave the paddle as is or attempt to lightly stain the new sassafras to at least darken it a bit.
March 25, 2017 Update: Paddle shaft has been wrapped with leather and is now complete. See the final post HERE.
Thursday, 23 June 2011
Walnut Passamaquoddy Northwoods Grip
After my modest success with the Cherry Maliseet and Fusion Paddle, I next decided to tackle another intriguing design. Graham Warren refers to this as the Passamaquoddy style...a narrow ottertail shaped blade and an elongated grip with carved stations for a variety of gripping positions. Upon doing some more searches, I come across some photos on Doug Ingram's Red River Canoe site outlining this grip in Cherry and Black Walnut. Another description was found on the Wooden Canoe Heritage Association site, a reprint of a WoodenBoat Magazine article (Issue #67) describing Garret and Alexandra Conover's Northwoods paddle.
 I was sold and wanted to try it out and decided to try this as my first attempt with Black Walnut. An expensive wood for sure, but I loved the dark chocolate look and was under the impression it was an easy carving wood. I ended up with a nice piece of 5/4 planed stock from Century Mill and begun the work. Most of the outlines on the paddle would of course be shaved off, but I wanted a visual of what the process might be before proceeding.
  While sawing out the blank on the balcony, I tried to maintain a single long, curved cut resulting in large "waste pieces". Immediately I thought these pieces could be re-used if I ever wanted to delve into laminated paddles...months later I would re-use these pieces in my first laminated paddle attempt. More on that paddle later.
 As soon as the blank was cut out, I placed with for a pose with all the balcony plants I had moved to the far end of the balcony. Everything was fine, until a few days later I noticed many of the plants starting to turn a yellowish colour. I thought it was the hot, dry summer and the direct SW exposure of our balcony, but later learned that Black Walnut shavings and dust contain a potent biological toxin, juglone, that is a growth inhibitor for competing plants. Oh well, live and learn.
 Shaving down the blade was pretty straight forward and in fact, photos from this paddle were used as part of a previous post on Shaping the Blade (Part 2). The wood itself is a delight to carve with a spokeshave which produces long curly strands of aromatic shaving. These quickly piled up. Seems wasteful, but the shavings are used as tinder firestarter at cottage. I've also read that the natural toxin juglone is an irritant if inhaled to other animal life, so that may keep the squirrels and pesky gulls from finding their way down the chimney.
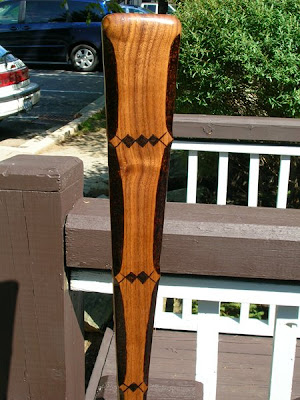
On to the grip! I bought a special tool just for this carving pattern. A hook (spooning) knife from Lee Valley...felt like splurging and have since used it many times. In addition to this, a simple curved gouge and trusty spokeshave were all that I needed to smooth out the carving. The unique carved pattern essentially leaves a a series of diamond patterns along the face and sides of the grip while leaving indented areas for you to grasp along any one of the "stations".


The grip was then further shaped with a rasp to round over the edge and with a spokeshave to taper and thin some of the lower section. At the time, I didn't want to mess around too much because the effort it took to carve out the shape, so I left it quite thick. When I compare to some newer paddles, this one seems quite bulky...a common mistake for beginners. I'll definitely try this grip pattern in the future but ensure I thin it out more. At anyrate, to visually emphasize the Northwoods grip style, I burned the indentations at full temperature and added some diamond patterns on the face to connect with the diamond patterns on the carving. For the blade, I was inspired to try an owl burning given that a few weeks before I had briefly spotted an one (I think it was a Long Eared Owl) while walking in some forest trails at the cottage. Here's how the final work turned out
Decorated grip pattern

Long-Eared Owl in White Pine

The whole paddle
Subscribe to:
Comments (Atom)

