Showing posts with label Passamaquoddy. Show all posts
Showing posts with label Passamaquoddy. Show all posts
Monday, 15 August 2016
Chris Fishers Passamaquoddy Paddle
Blog reader Chris Fisher sent in pics of his paddle creation...his very first! His 65", yellow birch paddle is based on the diamond-shaped c1849 Passamaquoddy design described in Bark Canoes & Skin Boats of North America (Fig 72: Adney & Chappelle).

Fig 72 - Adney Paddles
Chris added his own interpretation by changing up the grip and adding a carved drip ring at the throat. The whole thing was then decorated and stained with oil and red ochre...nice!


Chris' beautiful paddle creation

Carved drip ring and feathered blade edges
It also turns out that Chris is planning to build a birch bark canoe and like myself, is starting out with a 3 foot model. Good luck on the build and here's hoping he'll send more pics of his creations for all of us to enjoy.
Friday, 23 March 2012
Historic Passamaquoddy Paddle Part 1
About a month ago, I decided to get back to paddle making using a wood I hadn't used in a while - black cherry. The design I wanted to try came from Adney's book - an 1849 Passamaquoddy paddle decorated with a double scroll pattern on an elongated beavertail blade. In Canoe Paddles, there is a rough hand drawn sketch by Liz Regan of this very same pattern. A search revealed that the Peabody Museum also has a version of this paddle in their collection

Adney's sketch - Decorated Passamaquoddy on top

Peabody Museum paddle; Peabody Number 99-12-10/53655
I'm not the first person to try and replicate this paddle. Doug Ingram of Red River Canoe documented his version on his page on historic canoe paddles (UPDATE 2012 - unfortunately the original article is no longer online after switching internet servers). I ended up using Doug's image of the painted blade for my basic pattern.


Adneys's Illustration; Doug Ingram's paddle; Closeup of Blade
courtesy Doug Ingram - http://www.redrivercanoe.ca/
Instead of colouring the beautiful cherry wood with bright green paint however, my intention was to burn the negative image onto the blade, resulting in a look similar to the Fusion Paddle made last year. I also chose a different grip pattern than Adney since I had already put this style of grip on the Omer Birch. Instead, I used a stretched out Malecite grip that I've begun to favour. I free-handed a similar scroll pattern on the grip area. Burning the whole negative pattern on the paddle with just a tiny flow-point tip took a while, but I'm happy with they way it turned out.


Carved out paddle; Initial pattern; Completed blade
I was actually working on filling in the remaining portions on the handle section when my wife's water broke and the chaos of the little one's birth left this paddle in limbo. It's been in my den nearly complete for a while now and I'll always associate this paddle with the early delivery. Below is a shot of the incomplete paddle posing on a glorious Autumn day with the fall colours beginning in Toronto.

Incomplete paddle
Part 2 will be posted whenever I find the time to finish this one off.
UPDATE: November 20, 2008:: Paddle now complete - read Part 2
Thursday, 23 June 2011
Walnut Passamaquoddy Northwoods Grip
After my modest success with the Cherry Maliseet and Fusion Paddle, I next decided to tackle another intriguing design. Graham Warren refers to this as the Passamaquoddy style...a narrow ottertail shaped blade and an elongated grip with carved stations for a variety of gripping positions. Upon doing some more searches, I come across some photos on Doug Ingram's Red River Canoe site outlining this grip in Cherry and Black Walnut. Another description was found on the Wooden Canoe Heritage Association site, a reprint of a WoodenBoat Magazine article (Issue #67) describing Garret and Alexandra Conover's Northwoods paddle.
 I was sold and wanted to try it out and decided to try this as my first attempt with Black Walnut. An expensive wood for sure, but I loved the dark chocolate look and was under the impression it was an easy carving wood. I ended up with a nice piece of 5/4 planed stock from Century Mill and begun the work. Most of the outlines on the paddle would of course be shaved off, but I wanted a visual of what the process might be before proceeding.
  While sawing out the blank on the balcony, I tried to maintain a single long, curved cut resulting in large "waste pieces". Immediately I thought these pieces could be re-used if I ever wanted to delve into laminated paddles...months later I would re-use these pieces in my first laminated paddle attempt. More on that paddle later.
 As soon as the blank was cut out, I placed with for a pose with all the balcony plants I had moved to the far end of the balcony. Everything was fine, until a few days later I noticed many of the plants starting to turn a yellowish colour. I thought it was the hot, dry summer and the direct SW exposure of our balcony, but later learned that Black Walnut shavings and dust contain a potent biological toxin, juglone, that is a growth inhibitor for competing plants. Oh well, live and learn.
 Shaving down the blade was pretty straight forward and in fact, photos from this paddle were used as part of a previous post on Shaping the Blade (Part 2). The wood itself is a delight to carve with a spokeshave which produces long curly strands of aromatic shaving. These quickly piled up. Seems wasteful, but the shavings are used as tinder firestarter at cottage. I've also read that the natural toxin juglone is an irritant if inhaled to other animal life, so that may keep the squirrels and pesky gulls from finding their way down the chimney.
On to the grip! I bought a special tool just for this carving pattern. A hook (spooning) knife from Lee Valley...felt like splurging and have since used it many times. In addition to this, a simple curved gouge and trusty spokeshave were all that I needed to smooth out the carving. The unique carved pattern essentially leaves a a series of diamond patterns along the face and sides of the grip while leaving indented areas for you to grasp along any one of the "stations".


The grip was then further shaped with a rasp to round over the edge and with a spokeshave to taper and thin some of the lower section. At the time, I didn't want to mess around too much because the effort it took to carve out the shape, so I left it quite thick. When I compare to some newer paddles, this one seems quite bulky...a common mistake for beginners. I'll definitely try this grip pattern in the future but ensure I thin it out more. At anyrate, to visually emphasize the Northwoods grip style, I burned the indentations at full temperature and added some diamond patterns on the face to connect with the diamond patterns on the carving. For the blade, I was inspired to try an owl burning given that a few weeks before I had briefly spotted an one (I think it was a Long Eared Owl) while walking in some forest trails at the cottage. Here's how the final work turned out
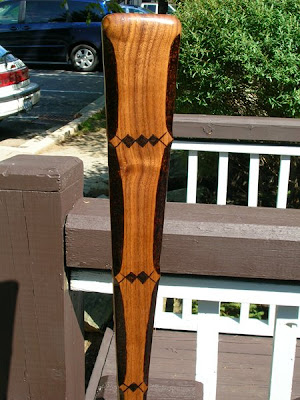
Decorated grip pattern

Long-Eared Owl in White Pine

The whole paddle
Sunday, 19 December 2010
Paddles Passamaquoddy Cultural Heritage Museum
Some paddles from the Public Facebook Wall of the Passamaquoddy Cultural Heritage Museum. Most look to be ash but a few seem like weathered maple with their blades painted a deep forest green. The subtle variety of grips tend to have that elongated feature I've begun to favour in my paddle carvings.

Variety of Passamaquoddy Paddles
Subscribe to:
Comments (Atom)

