Sunday, 24 May 2015
New Lightweight Canoe

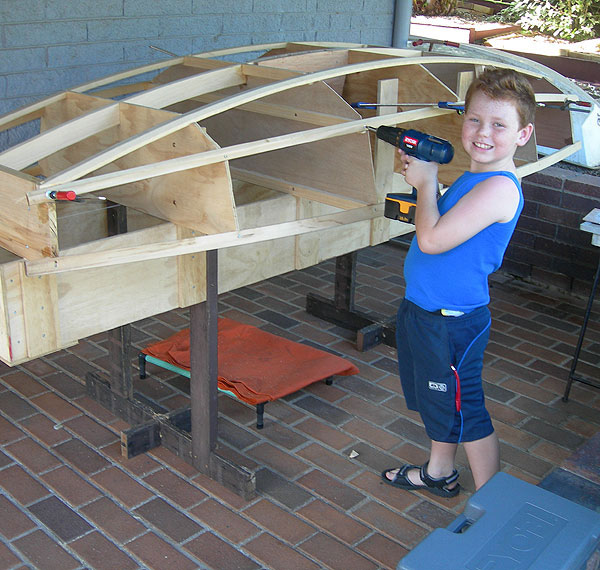
Its been a busy last few months, been working at Street Characters Inc. building mascots. Spent my evenings working on a wooden drawing machine (should upload some photos of that...) and yet another boat for my fleet. This ones a canoe, and I am working to keep it under 15 pounds so I can carry it into backcountry mountain lakes. The complete frame is to the right, it came out at around 10 pounds (4.5 kg). Which is not bad for an 11' boat
Its been a fun boat to build, to keep the weight down I had to use the clearest straight red cedar I could find. The stems and centre thwart are red cedar, and the ribs are local ash wood I got from Drew Beatie, who runs a portable bandsaw-mill.
For those wondering how you build something like this, read on.
 This is all the cedar stock, I start by running it through my bandsaw to rip it down to size. I dont have a jointer or a thickness planer so I hand plane all the pieces down smooth. I also dont have a carpenters bench so I use a 2x6 stuck in a workmate and resting on a saw horse for a planing bench. It works great.
 This is the creation of the stem pieces (the curved bits at the bow and stern of a canoe) They need to be really strong as they are what you tend to run into things with. I took a piece of yellow cedar, roughly 2.5x3cm and ripped it into thirds. The pieces were then steamed, and bent over a form together.
 They hold their shape pretty well once steamed.
 I then glued them together with PL Premium construction adhesive. Use a lot of clamps.
 The end then gets scarfed into the keel stringer. Most sane people use a table saw to do this. I don't trust mine, so I use a sliding miter saw. Cut a piece of scrap at 45 degrees, and clamp your piece to that. With a bit of futzing on the set up you can get a really accurate 8:1 scarf cut. Just be advised the the offcuts will launch, fortunately away from you.
 Installing the stems onto the keel stringer. It would probably be wise to drill a couple dowels to keep the two parts from sliding while you glue them. Learning is fun.
 These pieces are the breasthooks for the bow and stern. They attach the ends of the gunwales to the stems. To make them use a sliding bevel gauge to eyeball the angle that the gunwales meet the stem at, average all your measurements and take your best guess and set the miter saw to that.
 I tape them up so I dont have to clean off the glue, and then just glue and peg them in place.
 This is how you rip long stock in a very small and messy shop. I set up my bandsaw in the middle of the garage so then I can use my miter saw stand as an out-feed. It works better than those roller stands as you cant tip a mitersaw stand over easily. Here I am ripping thin stock off a big hunk of green ash for the ribs.
 Once ripped, its back to planing, by hand. Someone finally told me to stick a block of wood at the end of the bench for the piece being planed to rest against. Previously I was clamping the wood down. The block of wood makes life so much easier.
 Here is the hull blocked up with temporary ribs. These were left over from a previous experiment at making gluelam ribs. I learned that if you overclamp epoxied joints you squeeze all the glue out. Resulting in a useless rib for a functioning boat, but it works great as a form.
 The ribs were steamed and shoved in next to the temporary frame. This was my first experience steaming green wood, and hallelujah I have seen the light. After 15 minutes in the steamer you can pull these out and bend them into a 3 inch radius with no problems at all. And this is 3/8" thick ash wood.
 The hardest part of building this boat was working out all the little details, so here is a few shots showing some of the more tricky bits and how I worked them out.
First, this is where the stringers meet the stems. I cut them off at an angle to match the surface. Then tied a couple constrictor knots around the stringers. These keep the lashing from sliding off the front, I then wrapped around both stringers, made a couple frapping turns to secure it, then did a couple loops around the stems.
 This is the mini thwart at the bow and stern. I added this piece in because I felt the boat needed a little more wood to keep the gunwales from spreading. Its a simple Y lashing through a hole drilled in the thwart. You can see how the inwale and outwale are also secured with a lashing to hold them together.
 The centre thwart is lashed in much the same way. I added in a block of ash between the thwart and gunwale to help spread the load, red cedar is really soft wood. This joint isn't pegged or glued, the lashing holds it in place just fine.
 Shot of the final stem piece. The breasthook is glued to the gunwales, but only lashed to the stem. I wasnt sure what to do with the inwales so I just cut them off and lashed them to the outwale.
 Stem from a profile view, you can see the scarf joint on the keel stringer. I should probably put a couple lashings on it to secure it.
The
 complete frame.
 For you detail nuts, the dimensions of all the pieces are as follows: (all units cm)
Gunwales: inwale: 1.1 X 4 outwale:1.3 x 4
Stringers: 1.5 x 1.7
Keel stringer: 2.3 x 2
Floorboards: 4 x 0.9
Ribs: 2.6 x 0.9
Stems:2.4 x 2.2
Centre thwart: 3.3 x 2.2 in the centre tapering to 3 x 1.7 at the ends.
End thwarts: 1.1 x 1.77
The overall proportions of the boat are 11' long and 28" wide, its 13" deep amidships and is slightly wider aft of centre.
Friday, 12 December 2014
Blog Wooden boat building school new zealand
Wooden boat building school new zealand is normally one in every of the content under the now Young children and can on the history the search engines To be able to supply useful info to the subscribers we certainly have sampled to search out all the near relevance visuals round Wooden boat building school new zealand And additionally right you could watch at this time, these kinds of photos are already obtained in the top source.


Wooden boat building school new zealand - it has ended up created with all the requirement which usually you could stimulate essential someone. This informative article can easily assist being a guide remember when you are mystified to choose the best suited lead The Wooden boat building school new zealand content could be your better alternative to always be utilized by the package, mainly because it features a prepare will certainly experience additional fulfilled Wooden boat building school new zealand - Invaluable to suit your needs hence most people attempt to obtain a reliable form which inturn will help uou obtain idea without the need of misunderstanding. do remember for you to book mark this page, as its possible in the future you have to pick the software lower back since the inspirational tips.
Friday, 1 August 2014
New Paddle Blanks
After picking up my new batch of wood last week, I've been eagerly anticipating carving another set of paddles. There are still plenty of blade and grip designs yet to try, and in a fury of creativity, I quickly chose and drew out the designs for 7 new paddles.
Earlier today, I ended up spending 3 hours at The Carpenter's Square DIY workshop cutting out the blanks with the bandsaw. In addition I learned the use of a Jointer and Table Saw to square the edges on cutoffs and rip some of the stock into 1/4" strips for future laminated paddles.
New Blanks lined up
The designs (left to right) are Cherry Passamaquoddy Blade with Maliseet Grip; Cherry Passamoquoddy Blade with Athabascan Grip; Birch Attikamek (Tetes de Boule); Birch Beothuk with bobble grip; Birch King Island Single Kayak Blade (a commission piece); Walnut-Poplar Voyageur with tripper grip; Cherry-Poplar-Walnut Beavertail with an Assymetrical grip of my own design. I also cut out a Basswood double bladed kayak for another commission but it just wouldn't fit in the photo. This might be the 1st paddle I work on as there's a deadline for its completion (more photos in another post)
In addition, I still have some blanks left over from that I haven't gotten to yet. These include a Maple-Walnut Whitewater with Battenkill grip; Soft Maple Northwoods; and Poplar Diamond Passamaquoddy. The Walnut-Poplar blank (second from the left) eventually became the Adirondack Owl Paddle made back in March

Older blanks still waiting to be carved
The process of cutting out these single piece paddles created a bunch of offcuts that I saved for use in further laminated blades and other projects. In fact, I ended up using some of the previous offcuts in my growing scraps pile to make miniature paddles for decoration with my bark canoe model. I also used pieces that weren't suitable for paddle making anymore to cut out some spoon blanks. I'll probably end up carving these when I'm back up North and need a TV/Internet/Mass media break.

Spoon blanks and quarter-scale paddle blanks
Looks like there will be flurry of wood-working activity in the weeks to come.
Friday, 28 March 2014
New Orleans or Bust
Phil Middleton & Richard O’Connor are planning a mother of a canoe journey down the Mississipi River this spring. Starting at the headwaters of the St. Croix River in northern Wisconsin, their plan is to make it to New Orleans in an aluminum canoe. They've set up a great blog site to document their journey complete with their unique brand of humour.
While Rich has already bonded with a lightweight, cedar bent-shaft paddle, Phil took it upon himself to carve his own for the journey. Turns out he got his lumber stock from Timeless Timber, a unique company that deals in salvaged wood recovered from the murky depths of the Great Lakes. Phil scored a pretty interesting bit of yellow birch with a beautiful grain and documented the construction of his paddle (all handtools) in this post. Great stuff and a memorable way to prepare for this grand adventure!

Phil carving away

Phil's custom paddle for their journey down the Mississipi River
Wednesday, 27 February 2013
My New Paddle

I was in a creative funk this morning. Should be doing something but not feeling like doing anything. I hate that. So, I loaded the canoe and walked to South Lake Union. As soon as I started walking I felt better. It is a beautiful day, sunny, calm and heading towards 55F. Lake Union, mostly industrial ship stuff or marinas and houseboats is nice today. No other traffic on the lake other than 3 seaplanes that land. There are some scaups about near the north end and I notice that the two ships on the right of the photo are the Labrador and the Retriever. I have my new paddle out, a traditional shaped spruce one that I just completed. It is a little thick in places, but works well and I like it better than my store bought one. A few modifications and it will be nice. I'll make another, it was fun. Once through Portage Bay and the cut I head CW around Union Bay. I spot one eagle hunting something on the other side of an island. It is circling and swooping and has probably got a coot to dive. I surprise the big female eagle as I come around an island. She was sitting on a drift log just 4 feet from two Canada geese. She flies over to the "birch perch" and 4 other geese quickly get up and fly over and land directly under her - odd behaviour. I see the swans flying on the far side of the bay and I pause to look at the big female eagle in the birch. When I break my gaze, I look around I realize that I can see six herons and two bald eagles and that two raccoons are watching me. I head over towards the swans (eleven), which are scattered today in twos and threes and then turn SE towards the main lake. Now it is just time to paddle, not think, just listen to the rhythm and watch my upper arm as it sweeps across my view.
Sunday, 24 February 2013
New catamaran boat
New catamaran boat is definitely the style in the modern well known subject matter, we know from the analysis of the search engine as a way to furnish appropriate material most people consider to locate illustrations or photos regarding any New catamaran boat . and also the outcomes you can observe beneath please note some of the pictures is only some sort of illustration.
Pictures New catamaran boat


New catamaran boat - this has happen to be uploaded when using the requirement which always it is possible to easlily inspire utilized for your requirements can. This may well perform in the form of benchmark when you are confused to choose the right guide This New catamaran boat reports could very well be your opportunity being placed on the task program, while it includes unique system is going to come to feel extra contented New catamaran boat - Useful on your behalf consequently all of us want to discover a trusted supply that will help you come across creativity with no dilemma. keep away from towards discover these pages, as its possible in the future you have to pick the software lower back considering a fabulous inspirational ideas.
Tuesday, 24 July 2012
Get Model boat plans new zealand
Model boat plans new zealand might be undoubtedly one of necessary . beneath at this point We realize from your document yahoo To be able to supply useful info to the visitors we have attempted to locate a best meaning illustrations or photos all over Model boat plans new zealand Together with at this point you might look at these days, most of these graphics are considered within the biggest source of information.


Model boat plans new zealand - it has recently been published aided by the expectation which may it is possible to easlily inspire utilized for your requirements can. This article can serve as a reference remember when you are mystified to choose the best suited lead The Model boat plans new zealand items may well be your current decision that they are put on to the repair system, precisely as it seems to have the liechtenstein package definitely will look further thrilled Model boat plans new zealand - Very beneficial in your case consequently all of us want to discover a dependable cause in which will look for contemplation lacking mix-up. bear in mind so that you can take note of these pages, given that could be someday you may need it all to come back when a person's inspirational strategies.
Monday, 23 July 2012
Adapting Old Water Pipe to New

In New Zealand they have a 12.5mm pipe with push in fittings. You would think the half inch pipe might fit...., but no, it doesn't.
So here's how I have over come this problem...
Fortunately this plastic pipe is similar in size to copper half inch pipe and the compression fittings are available at most plumbing hardware stores.


First, use a dremel stone to slightly enlarge the hole in the center of the compression nut so that it slides over the plastic pipe. It only needs a "human hair" thickness taken off.

You can see that, in the photo to the right.


To the right is the fitting about to have the nut screwed on to make the compression. Once that is done, regular plumbing fittings can be attached.


Another method, show to the right is to get a hose tail with a plumbing threaded end, and attach with a suitable hose clip , or for a more secure fitting, use the wire tightener, and it's use can be viewed here.

